Understanding Format cmdlets view parameter

Sometimes the quickest way to discover something new in PowerShell is by making an typo error.

I wanted to know how many different views existed for the Get-Process cmdlet.

Although there are probably many ways to find the answer, the quickest one is by trying to guess it.

Get-Process | Format-Table -View GuessOrTypo


As you can see in the above screenshot, I got my answer straight away in the error message.
Yes, you should read carefully errors messages, they are most of the time useful and can even contain the answer on how to fix your typo.

If you’ve a problem with the color of error messages. You can change it to a different color

#requires -version 3.0
 if ($ise) {
    $Host.PrivateData.ErrorForegroundColor = [System.Windows.Media.Color]'Green'
 } else {
    $Host.PrivateData.ErrorForegroundColor = [system.ConsoleColor]::Green
 }

Let’s see what these views look like:

Get-Process -Id $PID
Get-Process -Id $PID | Format-Table -View process
Get-Process -Id $PID | Format-Table -View Priority
Get-Process -Id $PID | Format-Table -View StartTime

Another way of listing views that apply to the System.Diagnostics.Process object consists in digging into its formatting XML definition file

(
  [xml](Get-Content "$PSHOME\DotNetTypes.format.ps1xml")
).SelectNodes(
'//ViewSelectedBy[TypeName = "System.Diagnostics.Process"]/..'
)

The 4th view that you can see in the above snapshot that isn’t a Table is actually associated to the Format-Wide cmdlet

Get-Process | Format-Wide -View process

If you want to understand how PowerShell formats objects to display them, you can read more on this subject on these pages:

…and last but not least in the built-in help of PowerShell thanks to this shortcut:

Get-Help about_format.ps1xml

Testing MS13-098 Certificate Padding Check

Microsoft published last year both a security advisory and a security bulletin about Windows Authenticode Signature Verification.

The security bulletin was revised on May 21, 2014 to announce that the deadline of June 10 was postponed to August 12, 2014.
Two deadlines on June 10 breaking Windows was a bit confusing for customers and support teams, so the Marketing department changed the deadline… I’m kidding, of course 😉

I reported the above new cut-off date to the pachmanagement.org mailing list and some questions were raised about how to activate the certificate padding check and what tools should be used to test.
I replied that:

Now, I’d like share my experience, develop and illustrate what I wrote in the above message.

  • Step 1: Check that you’ve MS13-098 installed
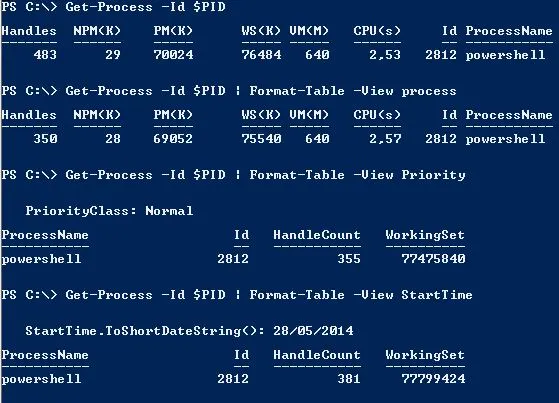
  • My test computer is Windows 7 x64 machine with PowerShell 3.0 installed.

    Get-HotFix -Id "KB2893294"
    
  • Step 2: Test without having certficate padding check enabled
  • Prerequisites: Like Didier Stevens, I’ve two “Chrome installers” that I renamed.

    # Download the latest version of sigcheck
    Invoke-WebRequest -Uri http://live.sysinternals.com/sigcheck.exe -OutFile .\sigcheck.exe
    Unblock-File .\sigcheck.exe
    # Download the AnalyzePESig tool and extract it manually
    Invoke-WebRequest -Uri https://didierstevens.com/files/software/AnalyzePESig_V0_0_0_3.zip -OutFile .\AnalyzePESig_V0_0_0_3.zip


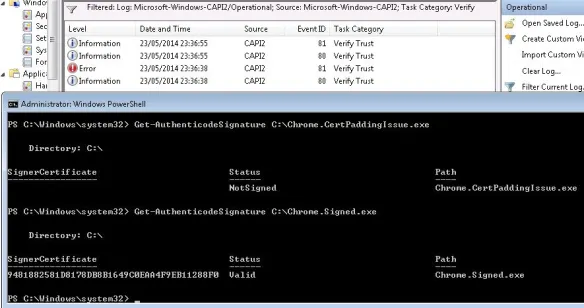
    Note that the Get-AuthenticodeSignature reports both portable executable (PE) installers as signed and the trust verifying events are logged into the Certificate API v2 log.

    Idem for sigcheck from Mark Russinovich

    I’ve created locally an Applocker policy with default rules and added a deny rule on the certificate found in the installer. Note that when I test the file against the applocker execution rules, it reports that its execution would be denied based on the publisher rule I introduced.

  • Step 3: Enabled the certificate padding check
  • This step is documented in the security advisory
    Here’s how I’ve enabled it with PowerShell based on the information found in the above advisory:

    if (-not(Test-Path -Path "HKLM:\Software\Microsoft\Cryptography\Wintrust\Config" -PathType Container)) {
        try {
            New-Item -Path HKLM:\Software\Microsoft\Cryptography\Wintrust\Config -ItemType Container -Force -ErrorAction Stop
            New-ItemProperty -Path HKLM:\Software\Microsoft\Cryptography\Wintrust\Config -Name EnableCertPaddingCheck -Value 1 -PropertyType String -ErrorAction Stop
            if ([System.Environment]::Is64BitOperatingSystem) {
                if (-not(Test-Path -Path "HKLM:\Software\Wow6432Node\Microsoft\Cryptography\Wintrust\Config" -PathType Container)) {
                    New-Item -Path HKLM:\Software\Wow6432Node\Microsoft\Cryptography\Wintrust\Config -ItemType Container -Force -ErrorAction Stop
                    New-ItemProperty -Path HKLM:\Software\Wow6432Node\Microsoft\Cryptography\Wintrust\Config -Name EnableCertPaddingCheck -Value 1 -PropertyType String -ErrorAction Stop
                }
            }
        } catch {
            Write-Warning -Message "Failed to create registry key because $($_.Exception.Message)"
        }
    }
    Get-Service -Name CryptSvc -Verbose | Stop-Service -Verbose -Force -PassThru | Start-Service -PassThru -Verbose
    

    A computer restart isn’t actually needed, you can only restart the Cryptographic Services. The Applocker service will be also restarted as it depends on the cryptographic services.

  • Step 4: Enable additional verbose logging in the CAPI2 event log
  • # Enable verbose diagnostic logging.
     
    # Add a DWORD (32-bit) value DiagLevel with value of 0x00000005
    Set-ItemProperty -Path 'HKLM:\System\CurrentControlSet\Services\Crypt32' -Name "DiagLevel" -Type DWORD -Value 5
     
    # Add a QWORD (64-bit) value DiagMatchAnyMask with value of 0x00ffffff
    Set-ItemProperty -Path 'HKLM:\System\CurrentControlSet\Services\Crypt32' -Name "DiagMatchAnyMask" -Type QWORD -Value 0x00ffffff
     
    # Enable CAPI2 operational logging
     
    $log = New-Object -TypeName System.Diagnostics.Eventing.Reader.EventLogConfiguration -ArgumentList "Microsoft-Windows-CAPI2/Operational"
    $log.isEnabled = $true
    try {
         $log.SaveChanges()
    } catch {
        Write-Warning -Message "Failed to save changes because $($_.Exception.Message)"
    } 
    
    Get-Service -Name CryptSvc -Verbose | Stop-Service -Verbose -Force -PassThru | Start-Service -PassThru -Verbose
    
  • Step 5: Test the Authenticode Signature Verification with certificate padding check enabled
  • Here’s a screenshot of the installer I’ve that has the certificate issue:

    Here’s the difference with the one that hasn’t the certificate padding issue:

    Now when I use the Get-AuthenticodeSignature with verbose CAPI2 logging enabled, verify trust events are reported both for either a failure or a success

    Get-AuthenticodeSignature C:\Chrome.CertPaddingIssue.exe
    Get-AuthenticodeSignature C:\Chrome.Signed.exe
    

    Idem for sigcheck.

    To measure the impact on the local applocker policy, I do:

    Get-AppLockerPolicy -Local | 
    Test-AppLockerPolicy -Path C:\Chrome.Signed.exe
    Get-AppLockerPolicy -Local | 
    Test-AppLockerPolicy -Path C:\Chrome.CertPaddingIssue.exe
    

    … and get the following result.

    In other words, the explicit deny rule based on certificate won’t prevent the C:\Chrome.CertPaddingIssue.exe to be executed anymore. Only the implicit rule deny for everyone will block it because it’s stored in a location that isn’t listed in an explicit allow or deny rule.

  • Step 6: Report
  • $HT = @{ ErrorAction = "SilentlyContinue" }
    $AMHT = @{ Type = "NoteProperty" ; PassThru = $true ; Force = $true }
    $FilterHT = @{ FilterHashTable = @{ LogName = "Microsoft-Windows-CAPI2/Operational" ; Id = 81 }}
    Get-WinEvent @FilterHT @HT | ForEach-Object -Process {
        $xml = ([xml]($_.toXML()))
        $_ | Add-Member -Name ProcessName   -Value ($xml.Event.UserData.WinVerifyTrust.EventAuxInfo.ProcessName) @AMHT |
             Add-Member -Name Result        -Value ($xml.Event.UserData.WinVerifyTrust.Result.value) @AMHT |
             Add-Member -Name FilePath      -Value ($xml.Event.UserData.WinVerifyTrust.FileInfo.FilePath) -Force -MemberType NoteProperty
             $msg = 'The WinVerifyTrust check performed by process {0} on file {1} ended with result {2}' -f $_.ProcessName,$_.FilePath,$_.Result
             $_ | Add-Member -Name Message -Value $msg @AMHT
    }
    

    Note that when the certificate padding check is enabled, the WinVerifyTrust function returns a 0x800B0100 value, which means “No signature was present in the subject”.

    Get the DHCP option set on your NIC

    Sometimes I’d like to get rid of the brave old ipconfig.exe but there are still some of its features that are not implemented in PowerShell cmdlets by default.

    You can for example define a DHCPv4 option on a network interface with ipconfig like this:

    ipconfig --% /setclassid "Local Area Connection" test-dhcp
    

    As far as I know, there isn’t any PowerShell cmdlet that allows natively to retrieve these dhcp options set on a Nic.


    Ok, I’ll do it 😀

    A Procmon trace reveals that ipconfig.exe just reads the registry to retrieve the value of these dhcp options.

    Here’s what I propose to “extend” on the fly the Get-NetAdapter, Get-NetIPConfiguration or Get-NetIPInterface cmdlets.

    # Get-NetIPConfiguration
    Get-NetIPConfiguration -All | ForEach-Object -Process { 
        $_ | Add-Member -MemberType ScriptProperty -Name "DHCPv4 Class ID" -Value {
            # Ipv4
            try {
                (Get-ItemProperty -Path "HKLM:\SYSTEM\CurrentControlSet\Services\Tcpip\Parameters\Interfaces\$($_.NetAdapter.DeviceID)" -Name DhcpClassId -ErrorAction Stop).DhcpClassId
            } catch {
                [string]::Empty
            }
        } -PassThru -Force | 
        Add-Member -MemberType ScriptProperty -Name "DHCPv6 Class ID" -Value {
            # Ipv6
            try {
                (Get-ItemProperty -Path "HKLM:\SYSTEM\CurrentControlSet\Services\TCPIP6\Parameters\Interfaces\$($_.NetAdapter.DeviceID)" -Name Dhcpv6ClassId -ErrorAction Stop).Dhcpv6ClassId
            } catch {
                [string]::Empty
            }
        } -PassThru -Force
    } | fl Interface*,DHCPv*
    
    # Get-NetIPInterface
    Get-NetIPInterface | ForEach-Object -Process {
        $_ | Add-Member -MemberType ScriptProperty -Name DhcpClassId -Value {
            switch ($_.AddressFamily) {
                "IPv4" {
                    try {
                    (Get-ItemProperty -Path "HKLM:\SYSTEM\CurrentControlSet\Services\Tcpip\Parameters\Interfaces\$((Get-NetAdapter -InterfaceIndex $this.InterfaceIndex).InterfaceGUID)" -Name DhcpClassId -ErrorAction Stop).DhcpClassId
                    } catch {
                        [string]::Empty
                    }
                    break
                }
                "IPv6" {
                    try {
                    (Get-ItemProperty -Path "HKLM:\SYSTEM\CurrentControlSet\Services\Tcpip\Parameters\Interfaces\$((Get-NetAdapter -InterfaceIndex $this.InterfaceIndex).InterfaceGUID)" -Name Dhcpv6ClassId -ErrorAction Stop).Dhcpv6ClassId
                    } catch {
                        [string]::Empty
                    }
                    break
                }
                default {}
            }
        } -Force -PassThru
    } | ft ifIndex,InterfaceAlias,AddressFamily,DhcpClassId
    
    # Get-NetAdapter
    Get-NetAdapter | ForEach-Object -Process {
        $_ | Add-Member -MemberType ScriptProperty -Name "DHCPv4 Class ID" -Value {
            try {
                (Get-ItemProperty -Path "HKLM:\SYSTEM\CurrentControlSet\Services\Tcpip\Parameters\Interfaces\$($this.InterfaceGUID)" -Name DHCPClassId -ErrorAction Stop).DhcpClassId
            } catch {
                [string]::Empty
            }
        } -Force -PassThru  | 
        Add-Member -MemberType ScriptProperty -Name "DHCPv6 Class ID" -Value {
            try {
                (Get-ItemProperty -Path "HKLM:\SYSTEM\CurrentControlSet\Services\TCPIP6\Parameters\Interfaces\$($this.InterfaceGUID)" -Name Dhcpv6ClassId -ErrorAction Stop).Dhcpv6ClassId
            } catch {
                [string]::Empty
            }
        } -PassThru -Force
    } | ft Name,InterfaceDescription,IfIndex,Status,MacAddress,LinkSpeed,DHCPv*Class*


    Update rollup of revoked noncompliant UEFI modules known issues

    Microsoft published this month a new security advisory and an Update rollup that will revoke noncompliant UEFI modules.

    However there are some known issues that are detailed in KB2962824

    You receive a 0x800f0922 error when you try to install this security update
    when you have a Windows Server 2012-based server that uses UEFI firmware and has the Secure Boot option enabled. The Windows Server can be a Generation 2 guest virtual machine (which is my case).

    Cause: This error occurs because the installer for this security update incorrectly expects BitLocker to be installed.

    To check if you a UEFI based BIOS, you can either use the msinfo32.exe utility in GUI mode,…


    … or call it from the commandline

    c:\windows\system32\msinfo32.exe --% /report .\msinfo.txt
    Get-Item .\msinfo.txt | 
    Select-String -pattern "^BIOS\sMode" -Context 0,5
    

    If you want to wait that the msinfo32 process has finished gathering the information, you can do:

    Start-Process -FilePath C:\Windows\system32\msinfo32.exe -ArgumentList "/report",".\msinfo.txt"
    While (-not (Get-Process -Name msinfo32).HasExited) {}
    

    You can also use the built-in SecureBoot module. With the cmdlet Confirm-SecureBootUEFI you’ll know whether the secure boot is enabled or not. It will return true or false

    To review the status of the bitlocker component, you can do:

    Get-WindowsOptionalFeature -Online | ? FeatureName -match "Bitlocker"
    # or
    Get-WindowsFeature | ? Name -match "Bitlocker"
    

    Now to fix this component requirement that caused the update to fail, you first review what will be done:

    Install-WindowsFeature -Name BitLocker -IncludeManagementTools -Restart:$false -WhatIf
    

    and then proceed by just removing the whatif parameter at the end of the line.

    Install-WindowsFeature -Name BitLocker -IncludeManagementTools -Restart:$false
    

    As you can see in the following screenshot, a reboot is required.
    Note that you can specify an internal source if you don’t want that missing components are downloaded from Windows Update.

    Just enabling the missing Bitlocker component fixed the security update install issue: